Clotted Cream Secrets: Why Unpasteurized Cream is Key to British Perfection
A dollop of rich, velvety clotted cream is more than just a topping; it's an experience, a taste of quintessential British tradition that transforms a simple scone into an indulgent delight. This thick, luxurious dairy spread, with its nutty undertones and subtly sweet finish, boasts a history stretching back some 2000 years, believed to have been introduced to England by Phoenician settlers. While its origins are ancient, its heart lies firmly in South West England, particularly the counties of Devonshire and Cornwall, regions so synonymous with its production that it's often affectionately known as Devonshire Cream or Cornish Cream.
But what elevates a good clotted cream to a truly exceptional one? Beyond the low-and-slow cooking process that coaxes cream and fat to rise and form delicate "clots," there's a secret ingredient that discerning home chefs swear by: the right kind of cream. Specifically, understanding why
unpasteurized cream (or at least regularly pasteurized, non-ultra-pasteurized cream) is absolutely crucial to mastering the art of homemade clotted cream. If you're wondering how to make clotted cream that rivals the best of Britain, this is where your journey truly begins.
The Enduring Legacy of Clotted Cream: A British Delicacy
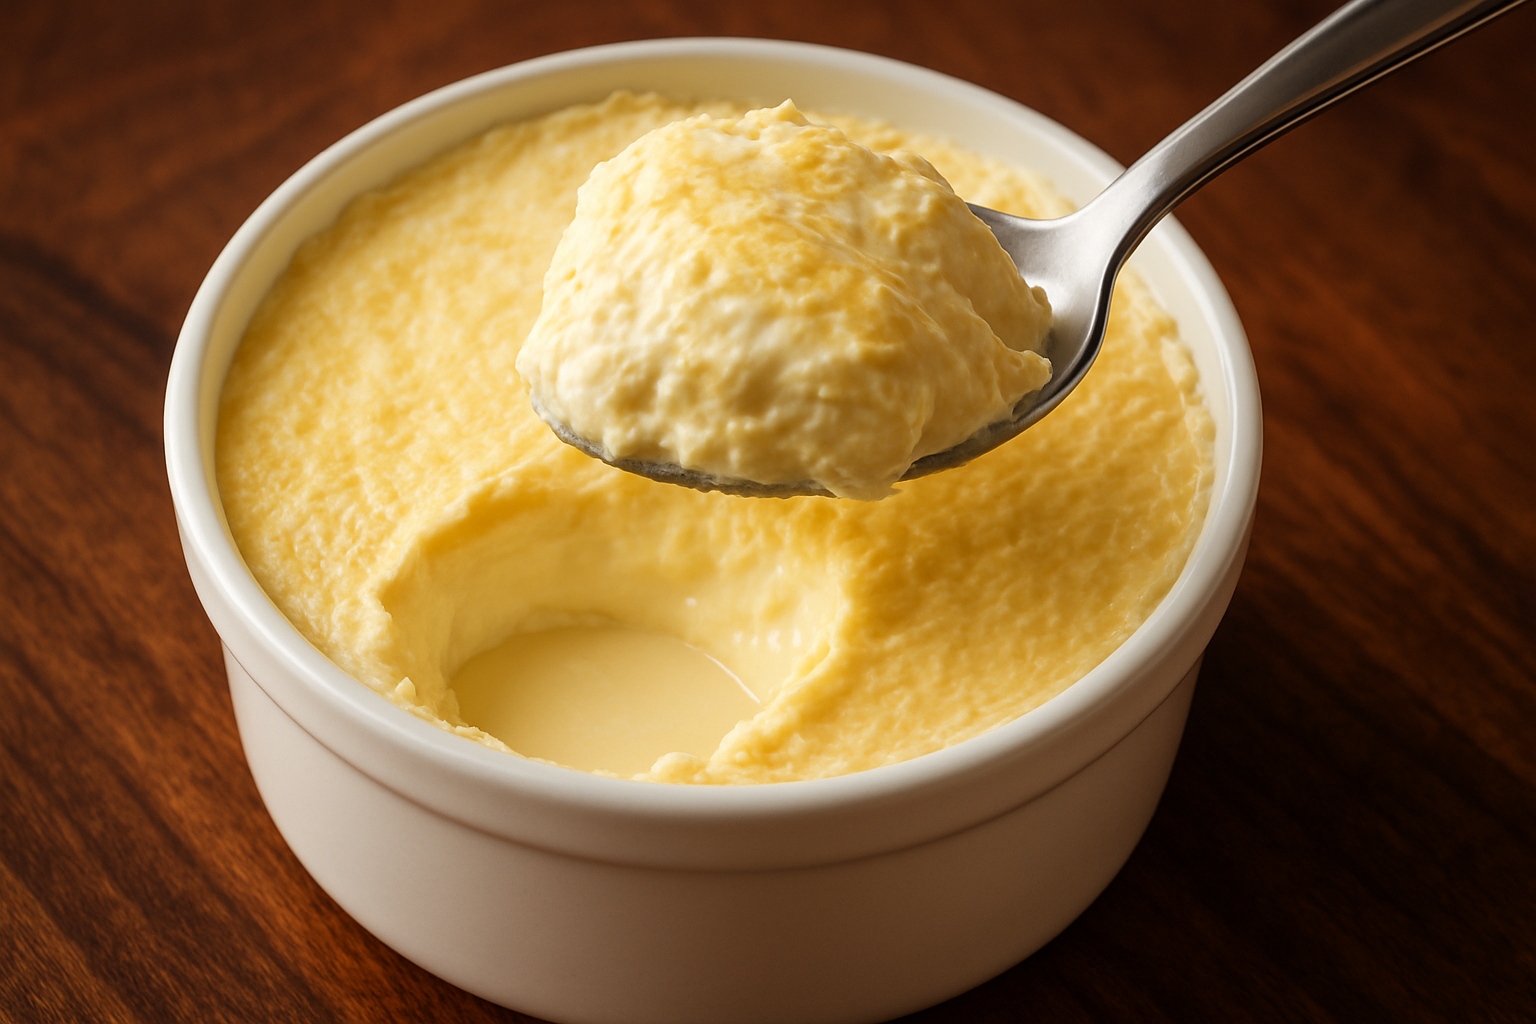
Clotted cream is a marvel of dairy science and culinary patience. It's a thickened cream, boasting a luxurious fat content of around 68%, making it significantly richer than its counterparts. The process involves gentle heat, which causes the milk solids and butterfat to slowly rise to the surface, forming a delectable, slightly crinkled crust – the "clots" that give it its name. This layer is then skimmed off, revealing the creamy treasure beneath.
To fully appreciate clotted cream, it's helpful to understand how it differs from other dairy products:
*
Double Cream: This is essentially a high-fat liquid cream (around 48% fat content), skimmed from milk before homogenization. It forms the base ingredient for clotted cream.
*
Butter: This solid fat is created by vigorously agitating (churning) double or heavy cream. This process damages the membranes surrounding the milk fats, allowing them to conjoin into a solid block. Butter is firm when cold and spreadable at room temperature.
*
Clotted Cream: By contrast, clotted cream is made by slowly baking double cream or heavy cream at a very low temperature for an extended period. This gentle heat treatment thickens the cream to its characteristic 68% fat content, resulting in a texture reminiscent of crème fraîche or softened butter, with a distinctive rich, nutty, and slightly sweet flavor profile. Its unique consistency and taste are what set it apart, making it the perfect accompaniment to fruit, desserts, and, of course, freshly baked scones.
The Crucial Ingredient: Why Unpasteurized (or Minimally Processed) Cream Reigns Supreme
At the heart of any successful clotted cream endeavor lies the choice of your primary ingredient: heavy (whipping) cream or double cream. While many think "cream is cream," the truth is far more nuanced, especially when aiming for that authentic clotted texture. The secret, as promised, lies in its processing – specifically, its pasteurization method.
Heavy cream typically has a fat content of 36%, while double cream boasts an impressive 48%. Both work well for making clotted cream, but their ability to "clot" effectively hinges on how they've been treated.
Understanding Pasteurization and Its Impact
Pasteurization is a heat treatment process designed to kill harmful bacteria in dairy products, ensuring safety and extending shelf life. There are several levels of pasteurization:
* **Regular Pasteurization:** This involves heating milk or cream to a specific temperature (e.g., 161°F/71.7°C) for a shorter duration (e.g., 15-30 seconds). This method is effective at sterilizing the product while largely preserving the natural structure of its proteins and fats.
* **Ultra-Pasteurization (UHT):** This is a much more aggressive heat treatment, subjecting the cream to higher temperatures (e.g., 280°F/138°C) for a very brief period (e.g., 2 seconds). UHT cream has a significantly longer shelf life, often allowing it to be stored unrefrigerated until opened.
Why UHT Cream is the Enemy of Clots
Here's the critical distinction: the intense heat of ultra-pasteurization fundamentally alters the proteins and fats within the cream. This denaturing process changes their molecular structure in a way that prevents them from separating and clumping together properly during the slow baking that defines clotted cream. When you try to make clotted cream with UHT-processed heavy cream, you'll often find it simply doesn't form the desired thick, bubbly, clotted surface. Instead, you might end up with a denser, more uniform baked cream that lacks the distinctive texture and richness.
The Advantage of Unpasteurized or Regularly Pasteurized Cream
For an authentic clotted cream, you'll want to source cream that is either unpasteurized (often called "raw" cream, though availability varies by region and legality) or, more commonly, *regularly pasteurized* and explicitly *not ultra-pasteurized*. These creams retain the integrity of their milk proteins and fats, allowing them to gently separate and thicken into those perfect, yielding clots during the prolonged, low-temperature cooking process.
Practical Tip for Sourcing: Always check the label! Look for "heavy cream" or "double cream" that specifically states "pasteurized" but avoids any mention of "ultra-pasteurized" or "UHT." Often, non-UHT creams will also have a shorter expiration date, which can be another indicator. Prioritizing this specific type of cream is the single most important step in how to make clotted cream successfully at home.
Mastering the Art of Clotted Cream: Your Step-by-Step Guide
Once you have your ideal cream, the process of how to make clotted cream is surprisingly straightforward, though it demands patience. It's an art of gentle heat and long waits, yielding immense rewards.
Essential Tools You'll Need:
* A large oven-safe baking dish (a 9x14 inch dish is excellent, as a wider surface area yields more clotted cream).
* Alternatively, a slow cooker or an electric pressure cooker (on slow cook mode).
* A non-reactive, heavy-bottomed pan (ceramic, enamel, glass, or stainless steel) for the stovetop method.
* A fine-mesh sieve or slotted spoon for skimming.
* A container for storage.
Method 1: The Traditional Oven Method
This is often considered the purest approach to homemade clotted cream, requiring minimal supervision once set up.
1.
Prepare the Cream: Pour your non-UHT heavy or double cream into your oven-safe dish. Aim for a depth of 1-2 inches. The larger the surface area, the more of that delightful "clot" layer you'll produce.
2.
Bake Low and Slow: Place the dish on the middle rack of your oven. Set the oven to a very low temperature, around 175°F (80°C).
3.
Wait (Patience is Key!): Bake for a full 12 hours, or until a bubbly, golden-yellow, thick skin has formed across the entire surface. Ensure your oven doesn't automatically switch off after a certain period, or you'll wake up to disappointment! Resist the urge to stir or disturb the cream during this crucial stage.
4.
Cool and Set: Carefully remove the dish from the oven and allow it to cool completely at room temperature (around 76°F/24°C). Once cool, cover the dish and refrigerate it overnight for at least 8-12 hours to allow the cream to firm up and the clots to fully set.
Method 2: The Slow Cooker Method
A fantastic alternative if your oven is occupied or you prefer the "set it and forget it" nature of a slow cooker.
1.
Prepare the Cream: Pour 1-2 inches of cream into a heat/shock-resistant bowl that fits inside your slow cooker.
2.
Create a Water Bath: Fill the inner pot of your slow cooker with 1-2 inches of water, ensuring it slightly floats the cream bowl. This creates a gentle, even heat distribution.
3.
Cook Gently: Place the lid on the slow cooker. Cook on the lowest setting (or around 175°F/80°C if your slow cooker has precise temperature control) for 12 hours, or until the familiar bubbly, yellow surface appears.
4.
Monitor and Adjust: Keep a close eye on the water level, adding more hot water if needed to prevent it from evaporating entirely. Crucially, slightly open the lid if the water begins to boil (212°F/100°C), as this temperature is too hot for perfect clotted cream.
5.
Cool and Set: As with the oven method, cool at room temperature, then cover and refrigerate overnight.
For a detailed walkthrough of both the oven and slow cooker methods, refer to our
Easy Homemade Clotted Cream: Oven & Slow Cooker Guide.
Method 3: The Stovetop Method (Requires More Attention)
While possible, this method is less common for traditional clotted cream as it requires constant vigilance and often yields a slightly different, less firm texture.
1.
Prepare the Pan: Pour your cream into a large, non-reactive, heavy-bottomed pan.
2.
Cook on Lowest Heat: Cook on the absolute lowest heat setting for about 30 minutes, or until the surface begins to thicken.
3.
Stir Constantly: Stir very often to prevent the cream from scorching at the bottom. This method is challenging to achieve the characteristic "clots" due to the constant stirring and direct heat.
Aftercare and Storage:
Once fully chilled, gently skim the thick, yellow clotted cream layer off the top using a slotted spoon or spatula. There will be some liquid whey underneath, which you can discard or save for baking. Transfer your glorious homemade clotted cream to an airtight container and store it in the refrigerator. It typically stays fresh for 3-5 days.
Troubleshooting and Tips for Perfect Clotted Cream Every Time
Even with the right cream, achieving perfection can sometimes require a few tweaks. Here are some common issues and expert tips:
Common Troubleshooting:
*
Cream Not Clotting: The most frequent culprit is using ultra-pasteurized (UHT) cream. Double-check your cream label! Other reasons could be the temperature being too high (it cooked too fast) or too low (not enough heat to initiate separation).
*
Scorched Taste: This usually happens if the heat was too high, especially with the stovetop method, or if your baking dish/slow cooker wasn't adequately insulated, causing the cream at the bottom to burn.
*
Clotted Cream is Too Thin: It likely hasn't cooked long enough. Extend the cooking time until a thick, yellow surface forms. Ensure your heavy cream has at least 36% fat content (or 48% for double cream).
Expert Tips for Success:
*
Wide and Shallow is Best: Always opt for a wide, shallow dish. A greater surface area allows more of the cream to be exposed to the heat, maximizing the formation of the precious "clots."
*
Patience, Patience, Patience: This cannot be stressed enough. Low and slow is the mantra for clotted cream. Rushing the process will compromise the texture and flavor.
*
Hands Off! Unless you're using the stovetop method, resist the urge to stir or check on the cream during its long bake. Let it do its magic undisturbed.
*
Chill Thoroughly: Don't skip the overnight refrigeration step. This is essential for the clotted cream to fully set and achieve its characteristic firm, yet spreadable, texture, making it easier to skim.
*
Don't Waste the Whey: The liquid whey leftover after skimming can be used in baking (like in scones or bread) or added to smoothies for an extra protein boost.
*
Experiment with Fat Content: While 36% heavy cream works, a 48% double cream will yield an even richer, thicker clotted cream.
Discover why homemade truly triumphs over store-bought versions in our article,
Homemade Clotted Cream: Better Than Store-Bought & Easy.
Conclusion
Making clotted cream at home is a rewarding culinary adventure that connects you to centuries of British tradition. While the process of how to make clotted cream is simple, the discerning choice of your primary ingredient—specifically, opting for unpasteurized or regularly pasteurized cream—is the true secret to unlocking that authentic, luxurious texture and rich flavor. By understanding this crucial detail and following the patient, low-and-slow cooking methods, you can recreate this iconic British spread in your own kitchen. So grab your cream, set your oven, and prepare to indulge in the unparalleled delight of homemade clotted cream.